

This section of the user guide is focused on creating a campaign. To help you navigate the article we have broken it down into the following sections:
- What are campaigns?
- Who can create a campaign?
- What are my options for creating a campaign?
- How do I complete the General Settings tab?
What are campaigns?
AI-backed, 1-to-many Two-Way Messaging keeps current and prospective students informed, supported, and on track. Campaigns can be staff-led or AI-backed to provide flexibility in managing your campaigns. AI-backed responses pull from Ocelot’s higher-ed specific, network-based AI library and allow staff to engage in conversations to provide more context and transition students to an expert assistant as needed.
Yes/no campaigns allow you to send a campaign designed to instigate a quick yes/no response from the student with an automatic response based on their reply. If the student is unsure, the conversation is routed to an agent to engage with the student to increase engagement.
Who can create a campaign?
The Two-Way Messaging campaign creation wizard is available to individuals with the following permissions:

For more information on user permissions, review the User Roles & Permissions article.What are my options for creating a campaign?
Prior to creating a campaign, review the Creating a Campaign Contact Lists article. A contact list will need to be created before the campaign can be launched. There are two options to begin creating a campaign:
- On the Campaign page, select the Schedule tab. Select the date you want to send the campaign and select Add.

- Select the Create Content button, and choose Create Campaign.
 On the campaign creation wizard, select Select and Continue next to the option you would like to use to begin building your campaign.
- From Previous
- Ocelot Campaign Templates
- From Scratch
From Previous
This option allows you to reuse a campaign already created.- Select the Select button next to the campaign you want to reuse.

- Update the title and any necessary fields for the campaign.
- Complete the General Settings tabsection.
- Select the Select button next to the campaign you want to reuse.
Ocelot Campaign Templates
Ocelot Campaign Templates. To start with a template, choose from the applicable departments that are available.Note: Ocelot has created Alumni Campaign templates for your use. We recommend the use of these Campaigns be agent-backed since Ocelot does not currently have an Alumni library.- Select the library or office the campaign will be associated with.

- There are a couple of ways to search/browse the campaign templates.
- Enter a keyword in the search field.

- On the right-hand column, filter by Topics, Goals, or Populations

- Enter a keyword in the search field.
- Select the plus icon next to the campaign template.

- Continue to the Complete the General Settings tab section.
- Select the library or office the campaign will be associated with.
From Scratch
Once you’ve used a few Ocelot Campaign Templates to become more familiar with the process of creating a Campaign, you will be ready to start creating Campaigns from scratch. Continue to the Complete the General Settings tab section.
How do I complete the General Settings tab?
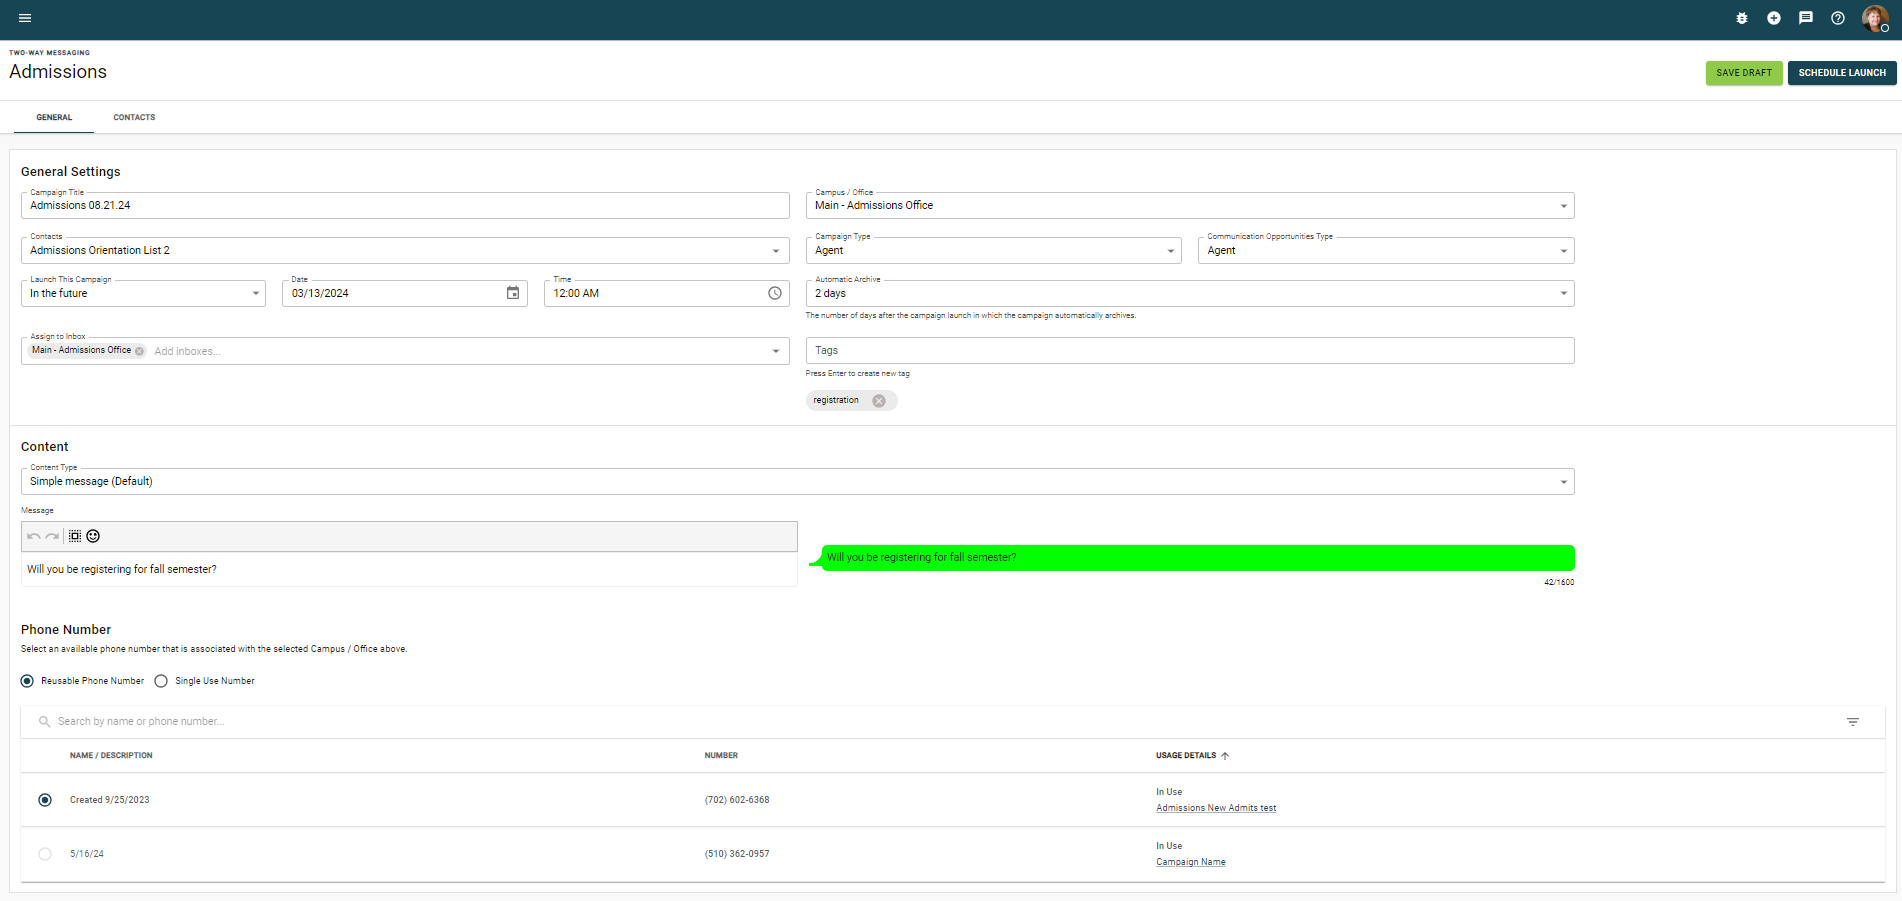
- Enter the Campaign Title. Make sure the title is unique and not used within another campaign.
- In the Campus/Office field, select from the dropdown the office associated with the campaign.
- In the Contacts field, select from the dropdown the contact list you want to use for your campaign.
- Select the Campaign Type - When a contact responds to your initial message, who will respond to their texts? Your Virtual Assistant or an agent?
Virtual Assistant - A Virtual Assistant-backed campaign will utilize your Virtual Assistant to respond to contacts who send text responses to the initial message.
Agent - An agent-backed campaign will allow staff admins to respond to contacts who send text responses to the initial message. Agent-backed campaigns should consider the amount of staff available to converse with contacts who respond to your message.
Note: Once the campaign has been launched, the type can be adjusted for individual conversations on the activity tab of an active campaign.

For example, a Virtual Assistant-backed conversation can be switched to agent-backed if an agent wants to jump into that conversation; An agent-backed conversation can be switched to Virtual Assistant-backed if an agent wants the Virtual Assistant to take over responding to a conversation.
From the Communication Opportunities Type dropdown select Agent or Custom Response.
Note: This applies to Virtual Assistant-backed Campaigns. When the Virtual Assistant does not know the answer to the contact’s question, how do you want the campaign to respond?Custom Response
Create a custom response that will be sent to the texting participant.
Agent
Agents are notified of Virtual Assistant-backed messages that contain a Communication Opportunity so that the agent can respond to the Communication Opportunity.
From the Launch This Campaign dropdown, select Immediately or In the Future
If you select Immediately, the campaign will launch after you have selected the Launch button.
If you select In the Future, the launch button will change to Schedule Launch. Edit the date and time you want the campaign to launch.
NOTE:  The launch time for a scheduled campaign must be set at least 30 minutes after the campaign creation time.

A scheduled campaign cannot be edited or canceled within one hour of the scheduled launch time.
- From the Automatic Archive dropdown, select the number of days after the campaign launches the campaign will automatically be archived.
Best Practice: Ocelot recommends archiving your campaign 7 days after the campaign has launched. However, you may need to take into consideration the audience and content of the campaign. - In the Assign to inbox field, if the campaign is Agent-backed, assign it to either an individual or office inbox.
- Tags(Optional) are keywords to search for campaigns.
In the Content Type dropdown, select either Simple Message or Yes/No Question.

- In the Message field, enter the message you want to use in your campaign. If you are creating a yes/no campaign, ask a yes/no question. If you are using a previous campaign or message from the Ocelot Library, review and make edits to the message as needed.
- If you are creating a Yes/No Campaign, in the Response Management section, configure the automated response for "Yes" or "No". Anything other than a yes/no response will be automatically routed to an agent.
- Selecting the Escalate to "Needs Attention" toggle will route users with that response to an agent.

- The Auto-Respond Message will be sent to all users with the associated response type.
- Responses classified as Other will automatically be escalated to Needs Attention.
- Selecting the Escalate to "Needs Attention" toggle will route users with that response to an agent.
- If you are creating a Yes/No Campaign, in the Response Management section, configure the automated response for "Yes" or "No". Anything other than a yes/no response will be automatically routed to an agent.
- Select a Phone Number.
Note: Due to industry-wide phone number registration changes, newly provisioned phone numbers can take 2 - 10 days to become active. It is highly recommended to use a previously provisioned phone number.- In the table are reusable phone numbers that have already been provisioned.
Best Practice: Ocelot recommends using a reusable phone number. This will allow for a better user experience.
- In the table are reusable phone numbers that have already been provisioned.
- Select Save Draft.

- Select either Launch or Schedule Launch (if you scheduled In the Future)

Note: It takes one second to send one simple 160-character message to a student, meaning a 1600-character message will take 10 seconds to send to one student.

Each special character used in the message (i.e. @, &, $, etc.) has the potential to add additional seconds.

Therefore, sending a simple 160-character message to 1,000 students will take 15 minutes, meaning the contact who is last on your list will receive the text 15 minutes after you launch.

A simple 320-character message (2 seconds/recipient) sent to 10,000 students will take 5 ½ hours. In other words, if you launch this type of campaign at 5:00 pm, the last recipient will receive the text at 10:30 pm.
Was this article helpful?
That’s Great!
Thank you for your feedback
Sorry! We couldn't be helpful
Thank you for your feedback
Feedback sent
We appreciate your effort and will try to fix the article