

This section of the user guide is focused on testing your virtual assistant. To help you navigate the article we have broken it down into the following sections:
- What is the Test my Virtual Assistant feature?
- Who has access to the Test my Virtual Assistant feature?
- How do I use the Test my Virtual Assistant feature?
- Testing the Communication Opportunity Response
- Testing the Explore Feature
- Testing Multilingual Virtual Assistants
- Testing Automatic Content Generation
What is the Test my Virtual Assistant feature?
It is important to test each question in the virtual assistant to better understand how you should update and customize the virtual assistant to your institution. The Test my Virtual Assistant feature allows you to test questions within the virtual assistant to see how it will respond and if the question needs to be updated or added to your knowledge base. It also allows you to test Automatic Content Generation to see how it will respond and if Knowledge Sources need to be adjusted. Lastly, it allows you to test office settings and behavior.
Who has access to the Test my Virtual Assistant feature?
The Test my Virtual Assistant feature is available to individuals with the following permissions:

For more information on user permissions, review the User Roles & Permissions article.How do I use the Test my Virtual Assistant feature?
If you have an office in staging, please refer to the Test Your Virtual Assistant in Staging article. The virtual assistant was built to speak to students, so test and customize it using student language instead of industry-based terms. (i.e., instead of testing “How is R2T4 calculated?”, test “Why was my aid returned?”)
- From the top-right of the admin’s homepage, select the Test My Virtual Assistant button.

The virtual assistant opens and is fully interactive. Enter questions that you would like the virtual assistant to be able to answer, such as your top FAQs from your students and parents.
Examples of the virtual assistant functioning successfully as designed:
Successful responses- It answers the question correctly from the knowledge base.

- It gives relevant suggestions.

- It utilizes web knowledge sources comprised of URLs from your school's website to scrape content to provide relevant links to questions asked within the virtual assistant.


- It utilizes your Knowledge Sources to generate generative AI responses to questions asked within the virtual assistant.

For more information on creating knowledge sources, review the Knowledge Sources and Knowledge Source FAQs articles.Responses that may need to be created
Responses may need to be created if:
The virtual assistant does not know the answer, also known as a communication opportunity, to an applicable subject-related question.
One option is to add a new custom question with the correct answer by clicking the Add A Response button. Further details on custom questions, including best practices, are outlined in the Creating and Editing a Knowledge Base Question article.

The second option is to enable Automatic Content Generation which leverages data from your Knowledge Source(s) to create generative AI responses on the fly which effectively reduces the number of times the virtual assistant does not know the answer. For information about how to add or edit a Knowledge Source, review the Knowledge Sources article. To test,
Responses that may need to be customized
Responses may need to be customized if:
- The existing answer is not correct for any of your school’s departments or audiences.
You will see an Edit Response button appear at the lower right corner of that interaction.
If Automatic Content Generation created the response, the Edit Response button will not be available and a new question will need to be created to add it to the knowledge base.For more information about how to create a new knowledge base question, review the Creating and Editing a Knowledge Base Question article.- The virtual assistant gives suggestions that do not help answer the question.
Since the virtual assistant searches for knowledge base answers before providing suggestions, add a new custom question with the correct answer.
- The virtual assistant returns a website search result that does not contain the correct answer on that page, review your web knowledge sources to determine if additional URLs should be added to provide relevant links.

For more information on creating and editing web knowledge sources, review the Knowledge Sources and Knowledge Source FAQs articles.How to customize responses
For information on how to create or edit an existing response, review the Creating and Editing a Knowledge Base Question article.Curious about how Ocelot uses Artificial Intelligence (AI) to return knowledge base responses? Review our AI Model document for details and FAQs!Testing the Communication Opportunity Response
- When the virtual assistant cannot provide a response to a user’s question/input, it will respond with a communication opportunity and ask if the user would like to contact the office. In order to test this function, ask the virtual assistant something it is not designed to answer. Our favorite is “What is a banana?”

- If the user says yes, the virtual assistant will ask for the applicable office.

- Once an office is chosen, the virtual assistant will activate the communication opportunity, which is either to:
- Display the office contact information to the user (this is the default unless a virtual assistant - administrator changes the communication opportunities behavior settings).
- Communication Opportunities intake form
- The communication opportunities intake form will ask the user for the following information:
- Name
- Phone
- Anything else they would like to add

- Once complete, a transcript of the entire conversation will be sent to the email set up on the Behavior Settings page, followed by an offer for the user to download a copy of the transcript.
For more information on the communication opportunities settings, review the Navigating the Admin: Behavior Settings article.
- The communication opportunities intake form will ask the user for the following information:
- If the user says yes, the virtual assistant will ask for the applicable office.
Testing the Explore Feature
The Explore feature provides additional options through AI for the user to choose from every time a question is asked. Suggestions (possible helpful responses from the knowledge base), Videos (from the video portal that contains possible related content), and Links (pages from your website with possible related content) will display as options for most interactions:
For more information on the Explore feature, review the Explore Bar Links and Videos article.Testing Multilingual Virtual Assistants
If your virtual assistant is multilingual, the applicable languages can be accessed in two ways:
- Select the globe icon at the top right corner and select a language, or


- Start typing in the applicable language into the virtual assistant and it will shift to that language’s mode.

Additional languages utilize a built-in translator, so there are no additional knowledge bases to maintain!
On the Interactions page, the conversation will appear in English when you select the conversation bubble to read the interaction. You can use the globe icon, to change it back to the native language. 
On the Transcripts page, the conversation will appear in English.
Testing Automatic Content Generation
The Test Automatic Content Generation feature within Test My Virtual Assistant allows you to simulate how your virtual assistant will respond using the current Automatic Content Generation settings configured in the default Behavior Settings.
How It Works:
- By default, the testing environment will adhere to the Automatic Content Generation settings configured in your system's default Behavior Settings.
- If there are no web knowledge sources configured the option to test Automatic Content Generation will not be available.
If testing Automatic Content Generation does not return expected results please review or adjust your web knowledge sources.

Additionally, if there are Departmental Learning Models in staging, please ensure that Include staging data is turned on.
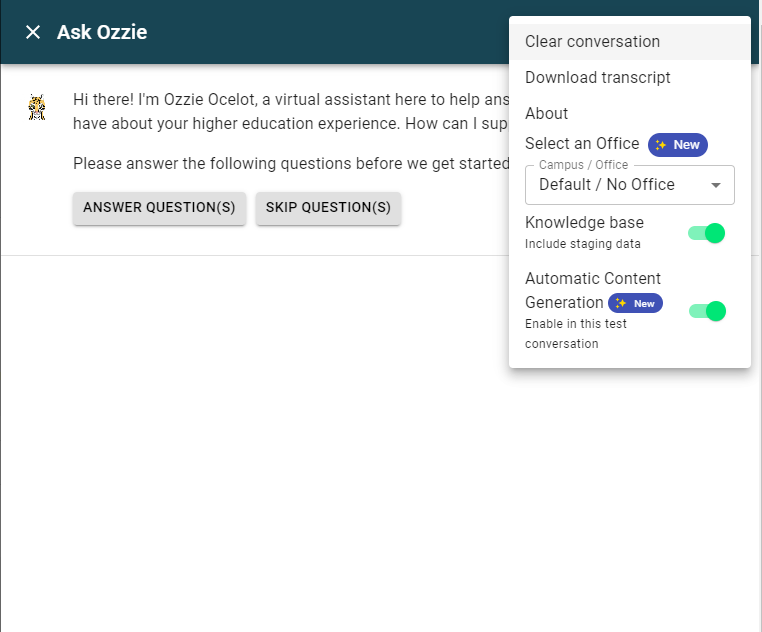
- Automatic Content Generation On/Off Toggle:
- When the toggle is on, the virtual assistant will utilize Automatic Content Generation for generating responses during the test.
- When the toggle is off, the virtual assistant will not use Automatic Content Generation, and the responses will be generated without this feature.
- Conversation Consistency:
- The Automatic Content Generation setting applies to the entire conversation. If you switch the toggle mid-conversation, you will be prompted with a confirmation popup. This is to ensure that you are aware that switching the setting will clear the ongoing conversation and start a new one with the updated configuration.
Permissions:
- Access to test Automatic Content Generation within Test My Virtual Assistant toggle, is available to anyone with the appropriate permissions within the client admin. Specifically, users who have access to Test My Virtual Assistant in the client admin can see and use this toggle.
Testing Automatic Content Generation per Office
To test Automatic Content Generation for an office, toggle on Automatic Content Generation then select the desired office from the new office drop-down menu and the office’s Look & Feel and Behavior Settings will automatically apply to testing even if it isn't enabled within the office's behavior settings. Automatic Content Generation does not have to be turned on within the live virtual assistant. 

This feature is available to anyone with access to Test My Virtual Assistant.
Was this article helpful?
That’s Great!
Thank you for your feedback
Sorry! We couldn't be helpful
Thank you for your feedback
Feedback sent
We appreciate your effort and will try to fix the article